If you already own one or more WordPress sites and want to use them for link building, you don't need to rebuild your workflow from scratch. The NextBacklinks WordPress plugin lets you connect an existing site to your NextBacklinks dashboard in a few minutes, using the Connect With Us option, so the site can start accepting and publishing backlink campaigns without any manual posting.
New to NextBacklinks? It's an off-page SEO platform for managing backlink campaigns, deploying and hosting your own network of sites, or connecting sites you already own, then running and reporting on link building campaigns from one dashboard instead of juggling several WordPress logins.
This guide walks through the exact steps inside NextBacklinks from starting the batch to seeing the site marked as Connected.
Why Connect an Existing Site Instead of Building a New One
Setting up a new website for link building takes time: buying a domain, installing WordPress, choosing a theme, writing enough content to make the site look legitimate, and only then thinking about links. If you already run WordPress sites a network of niche blogs, an old project, or sites you manage for clients then that setup work is already done.
Connecting an existing site skips the build phase entirely. The site keeps its own hosting, its own theme, and its own content history. All that changes is that it becomes reachable by a campaign dashboard, which can then push posts, sidebar links, or both to it automatically.
This matters for two groups in particular:
- Agencies and freelancers managing several client or personal WordPress sites who want one place to run and report on campaigns.
- Site owners who already maintain a small network and are tired of logging into each WordPress dashboard separately to post manually.
How the Connection Process Actually Works in NextBacklinks
Here's the exact flow, step by step:
1. Start a new batch inside NextBacklinks. Go to Site Management → Domain Batches, then click New Batch in the top-right corner. You'll be asked to enter a Batch Name and choose a Domain Category.
2. Choose "Connect With Us." On the next screen, select Connect With Us (instead of Deploy With Us, which is for sites NextBacklinks hosts for you). Click Save and Continue.
3. Upload your domain CSV. You'll be asked to upload a CSV file listing your domains along with their DA, DR, TF, and spam score. Click Save and Continue once it's uploaded.
4. Download the plugin. NextBacklinks now shows a summary screen for this batch, along with instructions and a direct download link for the NextBacklinks WordPress plugin. Right now this plugin is only available as a direct .zip download from this screen it isn't listed on the official WordPress plugin directory yet.
5. Upload the plugin to your WordPress site. In your WordPress admin panel, go to Plugins → Add New → Upload Plugin, select the .zip file you downloaded, and install it. No FTP or server access is required.
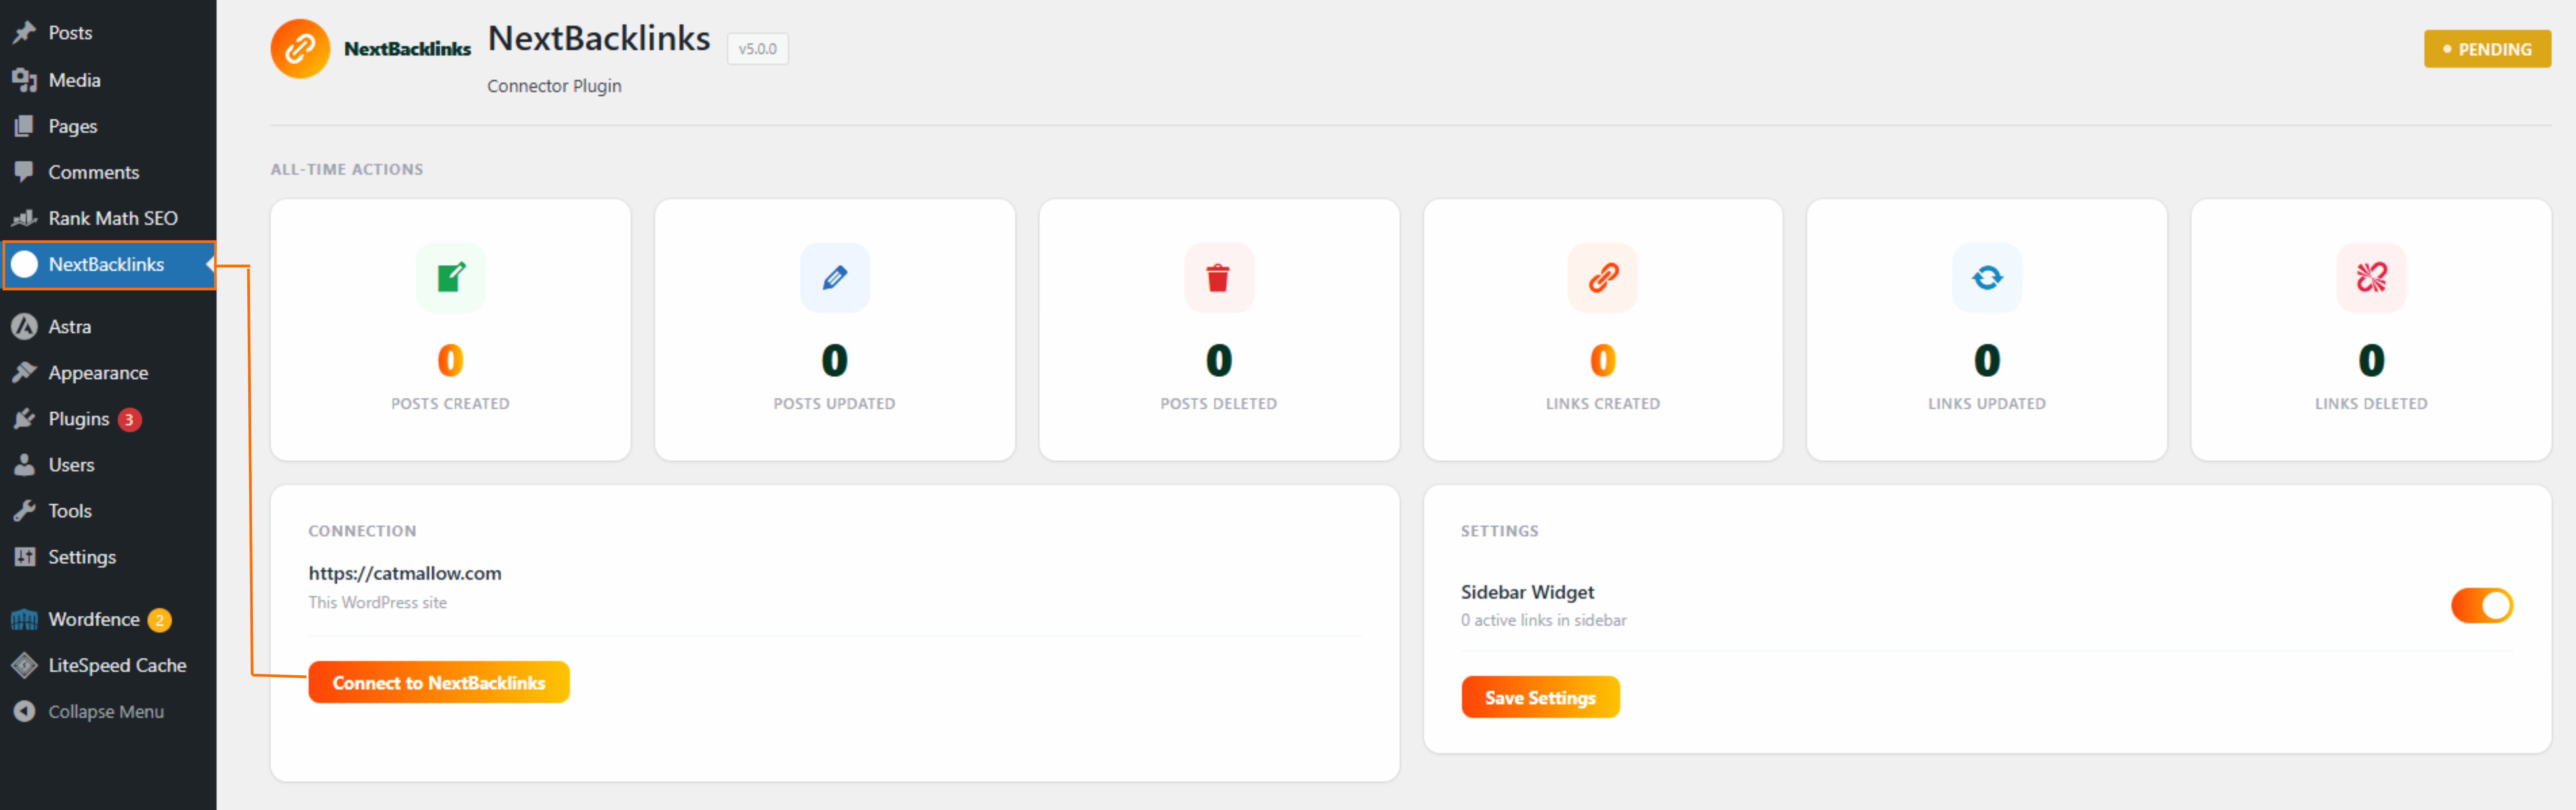
6. Open the "NextBacklinks" menu inside WordPress. Once activated, a NextBacklinks item appears in your WordPress left-hand admin menu. Click it to open the plugin's settings page.
7. Click "Connect." On this page you'll see a Connect button. Clicking it authenticates your site with your NextBacklinks account in the background. The status shown on this page will read Disconnected until the handshake finishes, then switch to Connected usually within a minute or two.
8. Enable the sidebar widget, then save. Next to the Connect button, there's a toggle to enable the sidebar widget on your site. Turn this on if you also want to run sidebar link campaigns (not just blog post links) on this domain, then click Save Settings and the toggle by itself doesn't apply until you save.

9. Check the activity log on the same page. The plugin settings page also shows a log of recent activity for this site connection status, last sync, and any campaigns that have run against it. This is the first place to check if something isn't behaving as expected.
Once the status reads Connected, the site appears back in your NextBacklinks dashboard as an available domain, ready to receive campaigns.
What Happens After the Site Is Connected
Once a site shows as Connected, it becomes selectable inside Run Campaigns, under either Blog Post Links or Sidebar Links whichever you enabled. From there, the workflow is:
- Select the connected domain in the Domains field when setting up a campaign.
- Choose the article to publish, either from an existing Article Set or a new one created through Article Sets (manual, AI-generated, spintax, or bulk upload).
- Fill in Client URL and Client Keyword the destination page and the keyword it should be associated with.
- Set optional parameters anchor rel (sponsored/no-follow), drip-feed timing, whether links should be unique, and whether the post is marked sticky.
- Click Run Campaign.
- Check results under Reporting, where the campaign appears with its status and a CSV export option.
The plugin's only job is to make the connected site reachable and postable. Everything else content, scheduling, and reporting happens inside the NextBacklinks dashboard, not on the WordPress site itself.
What to Check Before You Connect a Site
A few things are worth confirming before connecting a site, to avoid problems later:
- Plugin conflicts: if the site already runs heavy caching or security plugins, check that they don't block outside API calls, since the connection relies on the site being reachable.
- Hosting limits: shared hosting with strict resource limits can occasionally throttle automated posting. This is rarely an issue for small campaign volumes but worth knowing if you're connecting many sites at once.
- Content ownership: if the site has existing content and traffic, decide upfront whether new posts should blend into the existing niche or sit in a separate category, so the site's structure stays clean.
Sidebar Widgets vs. In-Content Links
Once connected, NextBacklinks lets you run two different link types from the same site:
| Link type | Where it appears | Best for |
| In-post/blog links | Inside new blog post content | Anchor-text-rich contextual links |
| Sidebar widget links | Persistent sidebar block | Steady, low-visibility link presence |
Running both from the same connected site gives more flexibility without needing a second plugin or a second site.
Frequently Asked Questions
Do I need developer or FTP access to connect a WordPress site?
No. The entire process happens through the standard WordPress admin panel upload the plugin like any other, activate it, and click connect.
Can I connect more than one WordPress site to the same account?
Yes. Each site is set up as its own batch under PBN Management → Domain Batches, so you can connect as many WordPress sites as you manage, each with its own connection status and activity log.
Will connecting the plugin change my site's existing theme or content?
No. The plugin only adds a way for campaigns to reach the site it doesn't modify your existing theme, pages, or posts unless a campaign specifically targets that content.
What if the status stays on "Disconnected"?
This is usually caused by a security plugin blocking outside requests, or a firewall rule on the hosting side. Checking the plugin's activity log is the fastest way to see where the connection is failing.
Is this different from building a new site through NextBacklinks?
Yes. Connect With Us is for site owners who already have WordPress installations running. NextBacklinks also offers Deploy With Us, which handles domain sourcing, hosting, and WordPress setup entirely on its own servers for anyone starting from zero that's a separate workflow from connecting a site you already manage.
Final Thoughts
Connecting an existing WordPress site to a backlink automation plugin is meant to remove the repetitive part of the process the manual logins, manual posting, and manual reporting while leaving the site itself untouched. For anyone already managing more than one or two WordPress sites, that alone is usually the difference between running campaigns consistently and letting them fall behind.
If you'd rather watch this process instead of reading it, the full setup — including Deploy With Us, Article Sets, and running your first campaign, is covered step by step on our Tutorials page.