NextBacklinks
Off-Page SEO, Automated.
NextBacklinks is a purpose-built SEO automation portal for search engine optimizers. Manage your entire backlink workflow - from PBN deployment and domain batches to AI article generation and drip-feed campaigns - in one centralized platform.
What is NextBacklinks?
NextBacklinks is a comprehensive SEO automation platform designed to streamline the entire backlink workflow. Whether you're managing a Private Blog Network (PBN), running agency campaigns, or building owned media networks, NextBacklinks handles domain management, content production, campaign scheduling, and performance tracking-all in one integrated workspace.
Core Features
PBN Deployment
Fully automated WordPress site setup from domain registration through SSL configuration. Connect existing sites or let the platform handle complete deployment.
AI Content Generation
Integrated AI article production powered by ChatGPT and DeepSeek. Generate thousands of unique articles with custom tone, topic targeting, and automatic publishing.
Drip-Feed Scheduling
Spread backlinks naturally over time to avoid detection. Schedule campaigns across days, weeks, or months with customizable publishing intervals.
Campaign Reporting
Track campaign performance with real-time metrics. Export detailed reports by domain, campaign, or client with custom formatting options.
Link Types & Customization
Choose between blog post links for deep authority or sidebar widget links for wide distribution. Fully customize anchor text, categories, and targeting parameters for each campaign.
Manual Content Upload
Upload your own written articles individually or in bulk via Google Docs. Mix AI-generated content with your custom pieces for maximum SEO impact and brand consistency.
Platform Workflow
NextBacklinks follows a logical four-step workflow designed to guide users from initial setup through campaign execution and monitoring:
Connect
Link registrar accounts, AI services, and DNS providers. Authorize integrations once and manage everything from NextBacklinks.
Organize
Create domain batches, build article libraries, and organize content by niche. Set up reusable assets for consistent campaign launches.
Launch
Deploy campaigns with a single click. Publish blog posts or sidebar links across your PBN with drip-feed scheduling enabled.
Monitor
Track link velocity, publishing status, and campaign performance in real time. Download reports and adjust strategies based on data.
Dashboard Overview
The dashboard is the main hub where you'll spend most of your time. It provides a comprehensive view of your portfolio, active campaigns, and domain metrics at a glance.
New User Dashboard: Getting Started Guide
When new users first log into NextBacklinks, they see a comprehensive "How It Works" guide that walks them through the entire setup process in four simple steps.
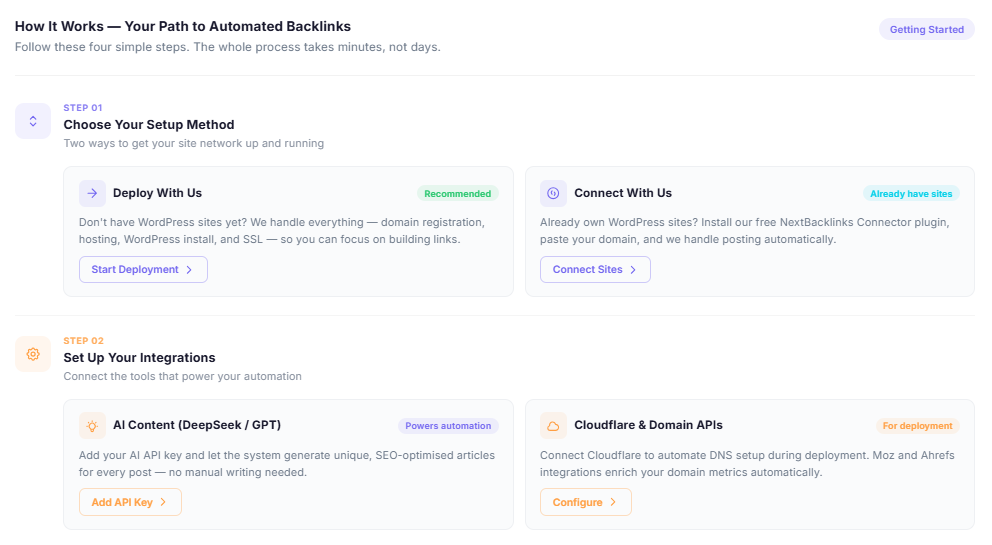
Step 01: Choose Your Setup Method
Two ways to get your site network up and running:
Don't have WordPress sites yet? We handle everything - domain registration, hosting, WordPress install, and SSL - so you can focus on building links.
Learn more →Already own WordPress sites? Install our free NextBacklinks Connector plugin, paste your domain, and we handle posting automatically.
Learn more →Step 02: Set Up Your Integrations
Connect the tools that power your automation:
Powers automation. Add your AI API key and let the system generate unique, SEO-optimised articles for every post - no manual writing needed.
Learn more →For deployment. Connect Cloudflare to automate DNS setup during deployment. Moz and Ahrefs integrations enrich your domain metrics automatically.
Learn more →Step 03: Launch Your First Campaign
Start posting backlinks across your sites automatically:
Schedule full blog posts with embedded anchor-text links across your sites. Our AI writes the articles and posts them on your chosen dates.
Push sidebar widget links to your sites. Fast, lightweight, and perfect for building topical authority across many domains at once.
Step 04: Track Results & Export Reports
Monitor every link, post, and domain metric in one place:
Always up-to-date. See every posted URL, go-live date, DA, DR, TF, and spam score. Filter by campaign, domain, or date range with one click.
Client ready. Track all sidebar link placements. Export as CSV or share a read-only link directly with your clients - no login needed on their end.
Active User Dashboard: Portfolio Metrics
Once users complete setup and add domains, the dashboard transforms into a comprehensive metrics hub showing portfolio performance and campaign insights.
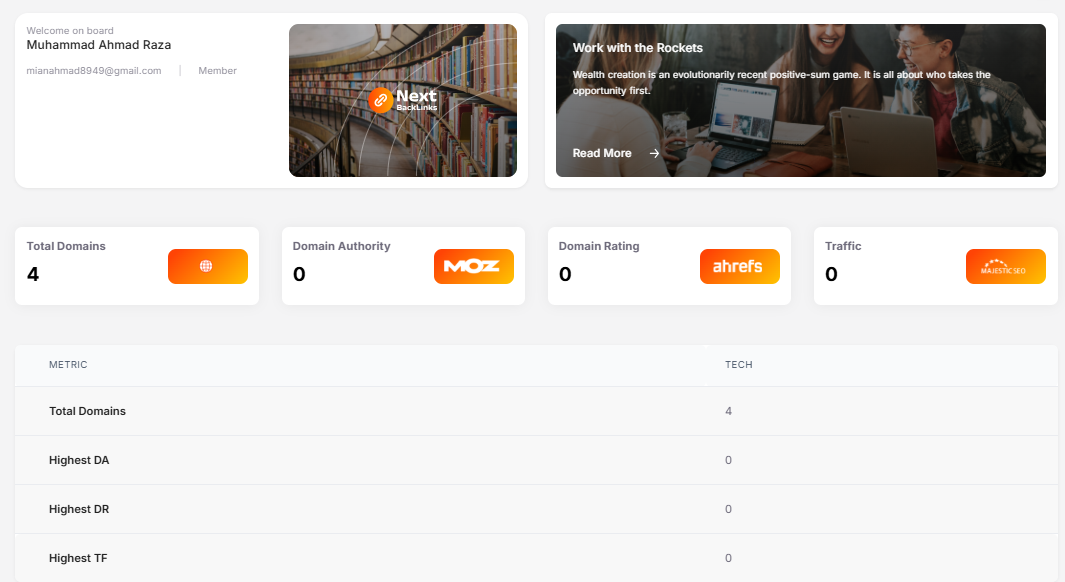
Portfolio Highlights Table
Below the main metrics, you'll find a detailed breakdown table showing:
Complete domain count with breakdown by batch or status.
Your strongest domain by Moz Domain Authority score.
Top-performing domain by Ahrefs Domain Rating.
Domain with the highest Trust Flow score.
Key Modules
PBN Management
Create domain batches, deploy WordPress instances, and manage site configurations. Track deployment status and monitor domain performance metrics.
Learn more →Domains
Manage your domain portfolio with detailed metrics. Import domains from registrars, organize them into batches, and monitor domain authority and traffic.
Learn more →Article Sets
Build article libraries powered by AI or manual uploads. Create multiple article sets for different niches and link types, ready for campaign deployment.
Learn more →Run Campaigns
Launch blog post and sidebar link campaigns with drip-feed control. Schedule publications, set targeting parameters, and monitor execution in real time.
Learn more →Reporting
Generate detailed campaign reports by domain, client, or date. Export data in multiple formats and analyze performance metrics to optimize future campaigns.
Learn more →Integrations
Connect registrars (DynaDot, Namecheap), AI services (ChatGPT, DeepSeek), and DNS providers (Cloudflare) for seamless workflow automation.
Learn more →Getting Started
Ready to launch your first campaign? Follow these initial steps:
- Create an account at app.nextbacklinks.com and verify your email address.
- Connect integrations by adding API keys for your registrar account and any AI services you plan to use.
- Add your first domain batch by importing existing domains or registering new ones through the platform.
- Build an article set using AI generation or by uploading your own content library.
- Launch your first campaign with a small test group of domains to verify settings before scaling.
- Monitor and optimize by reviewing reports and adjusting your strategy based on performance data.
Ready to get started?
Log in to your NextBacklinks account or explore the platform with our video tutorials.
Getting Access
Navigate to app.nextbacklinks.com and create a new account or log into your existing account. After successful authentication, you will be automatically redirected to your main Dashboard.
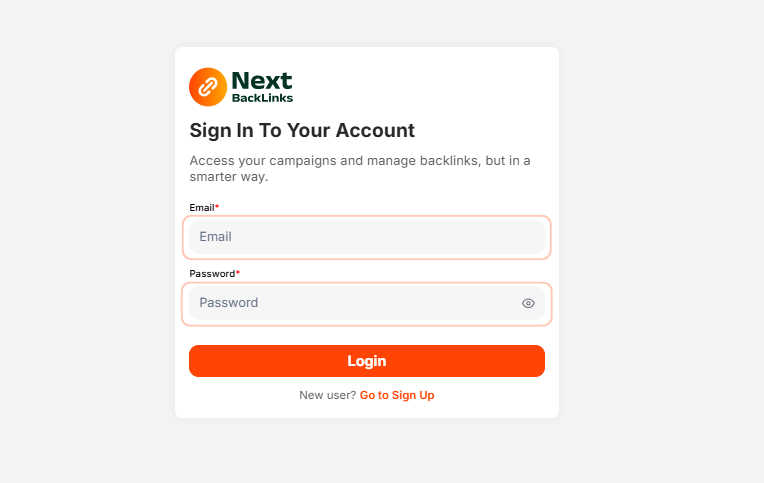
Enter your email and password to access the platform. New users can create an account from the same screen.
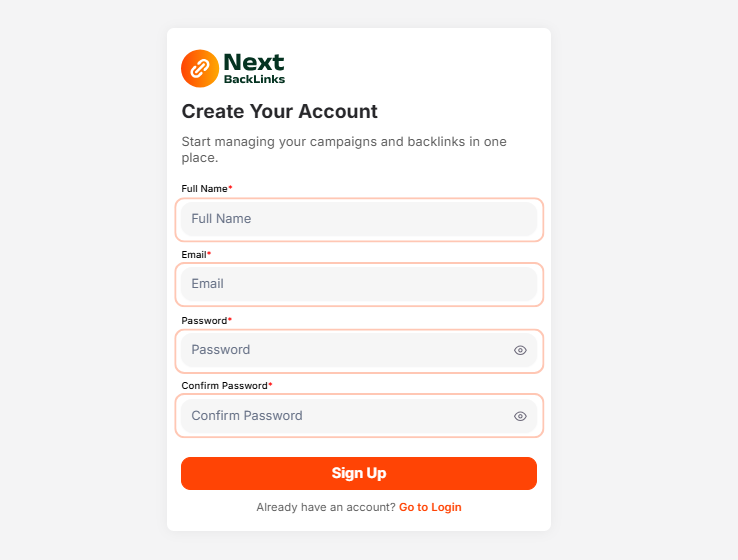
Create a new account by filling in your details. Once registered you will be redirected straight to your dashboard.
Overview Panel
The dashboard is split into two panels. The left sidebar contains navigation tabs for all platform modules. The right content area shows your active workspace.
When new users first log in, the dashboard shows a step-by-step "How It Works" guide walking through the entire setup process.
Domain Metrics Summary
Once you have added domains, the dashboard displays your portfolio-level metrics at a glance:
Once domains are added, the dashboard transforms into a metrics hub showing portfolio performance, DA, DR, traffic, and campaign insights.
Portfolio Highlights
A summary table shows your top-performing domains by key metrics: highest DA, highest DR, and highest TF (Trust Flow).
Domain Batches Overview
Under PBN Management → Domain Batches, you see a list of all domain batches you have created. The summary bar across the top shows four counters at a glance:
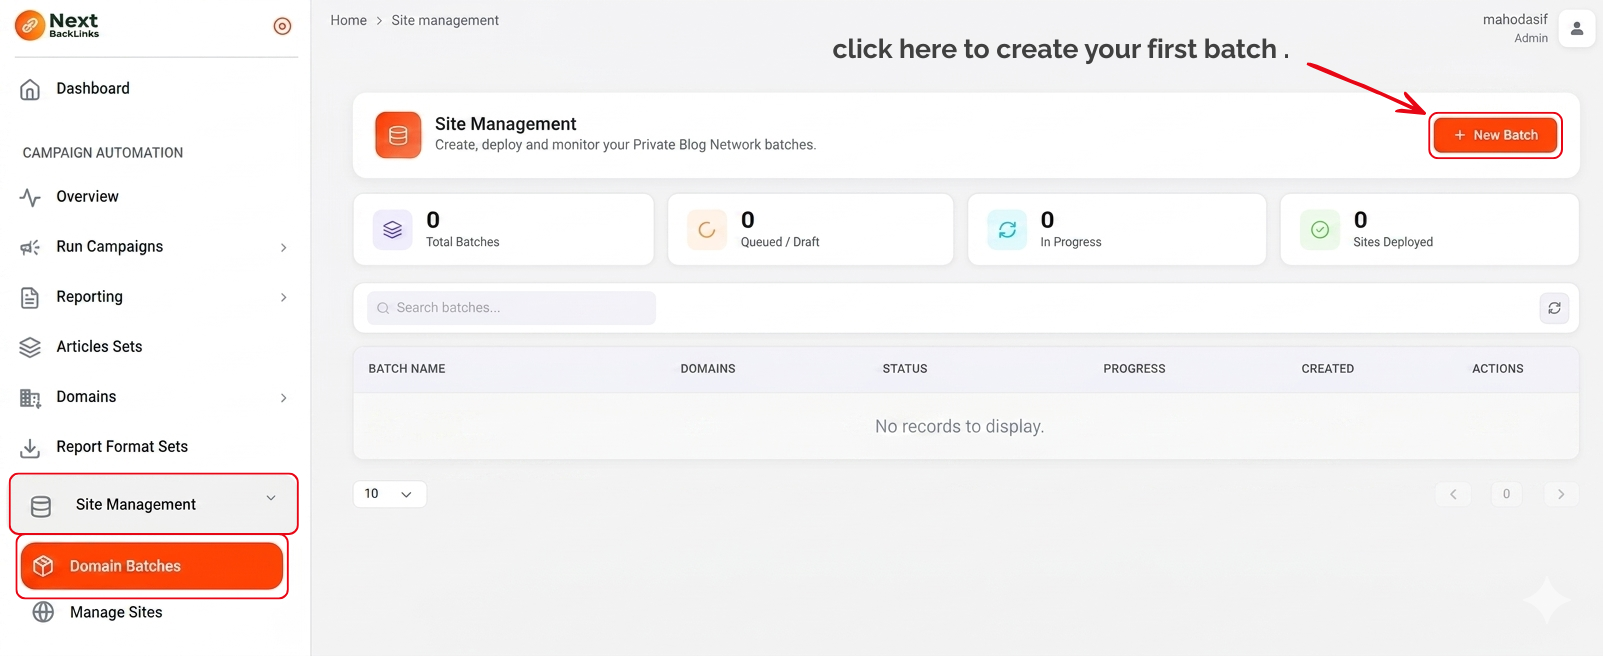
When no batches exist yet, the platform prompts you to create your first batch to get started.
Creating a New Batch
Clicking New Batch opens a new page where you fill in two mandatory fields before choosing your deployment method:
After filling in both fields, you choose between two deployment methods: Deploy With Us or Connect With Us. Your choice determines the rest of the setup flow.
Choose Your Deployment Method
Deploy With Us
NextBacklinks handles everything: WordPress installation, hosting, and Cloudflare DNS - all on NextBacklinks' high-speed, secure servers. Ideal for SEOs who want a fully automated PBN with zero manual server or WordPress configuration.
Connect With Us
For users who already own WordPress sites. Upload your domains via CSV, install the NextBacklinks plugin on each WP site, and connect it to the platform. NextBacklinks then posts campaigns to your existing sites automatically.
Deploy With Us - Step-by-Step Flow
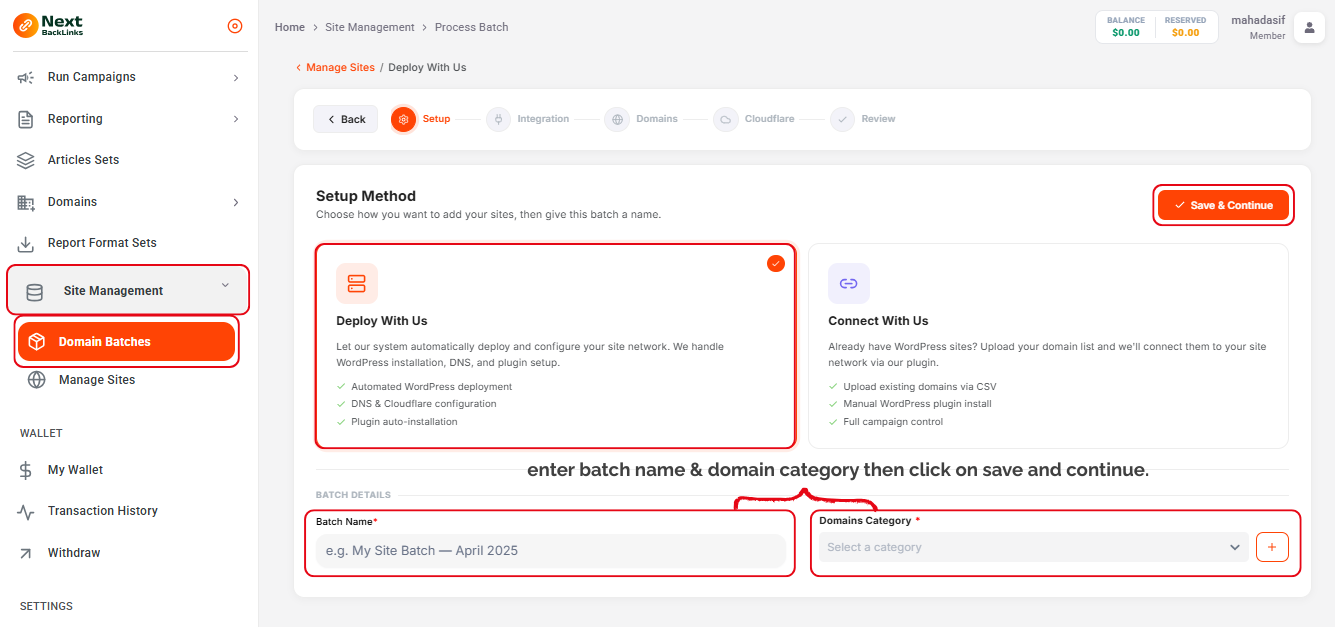
Fill in the batch name and domain category, then select Deploy With Us before clicking Save & Continue.
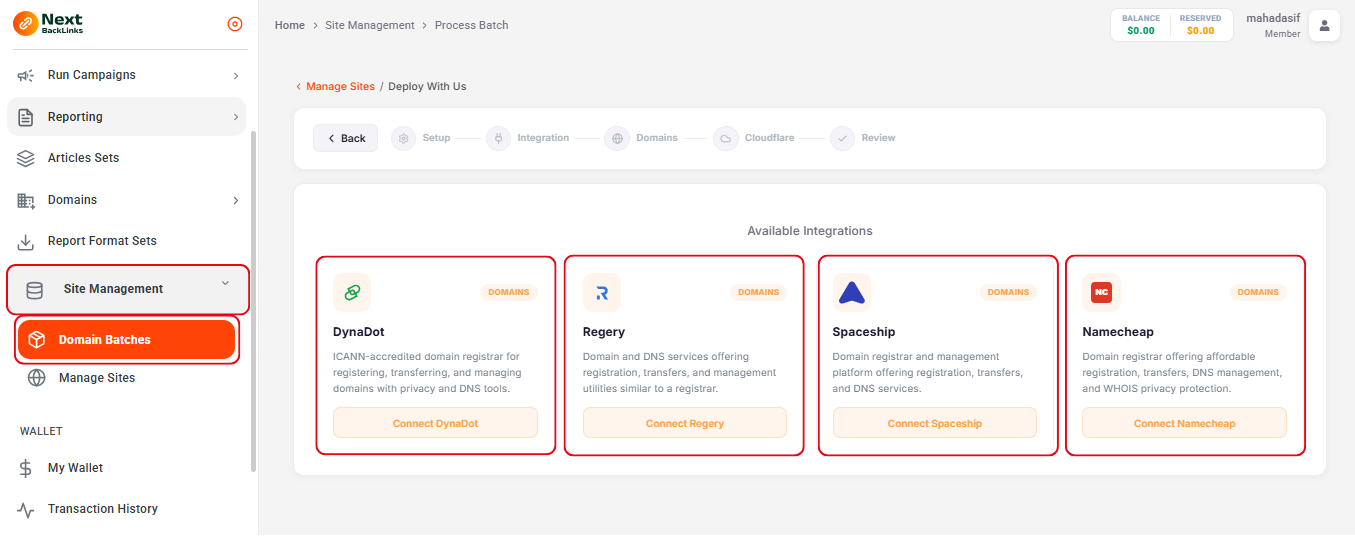
Select your domain registrar from DynaDot, Regery, Spaceship, or Namecheap and enter your API credentials to connect your account.
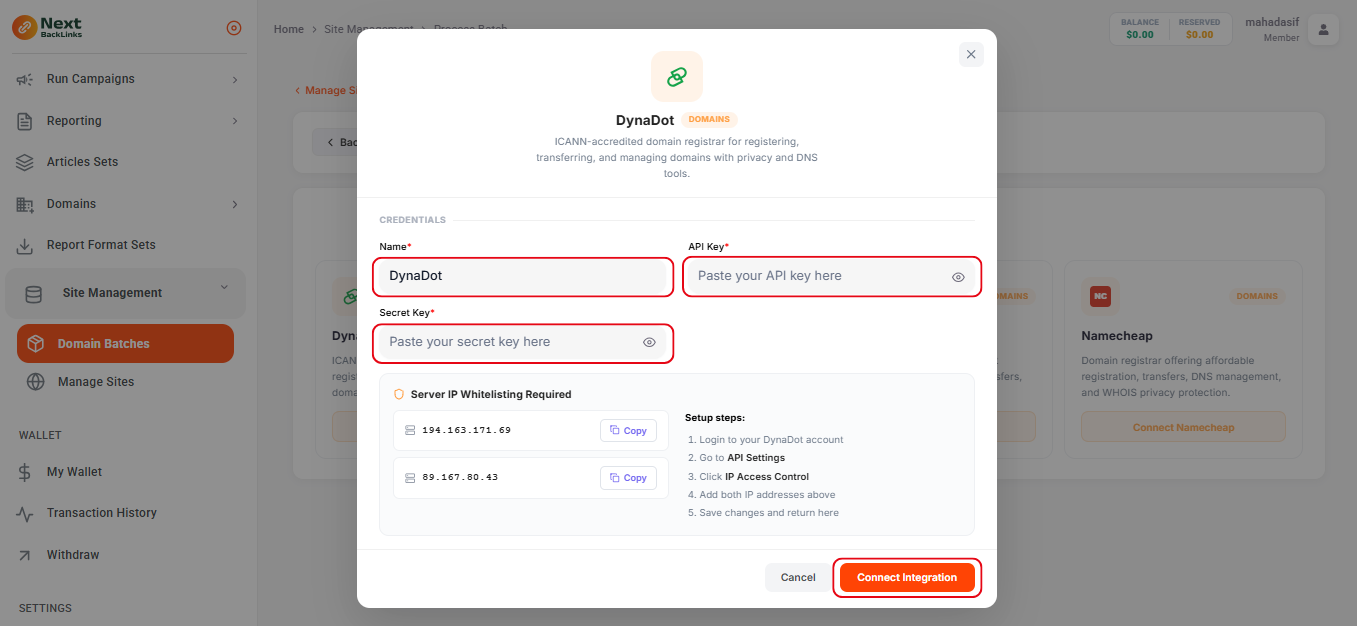
Enter your registrar API Key and Secret Key, then click Connect Integration to verify the credentials.
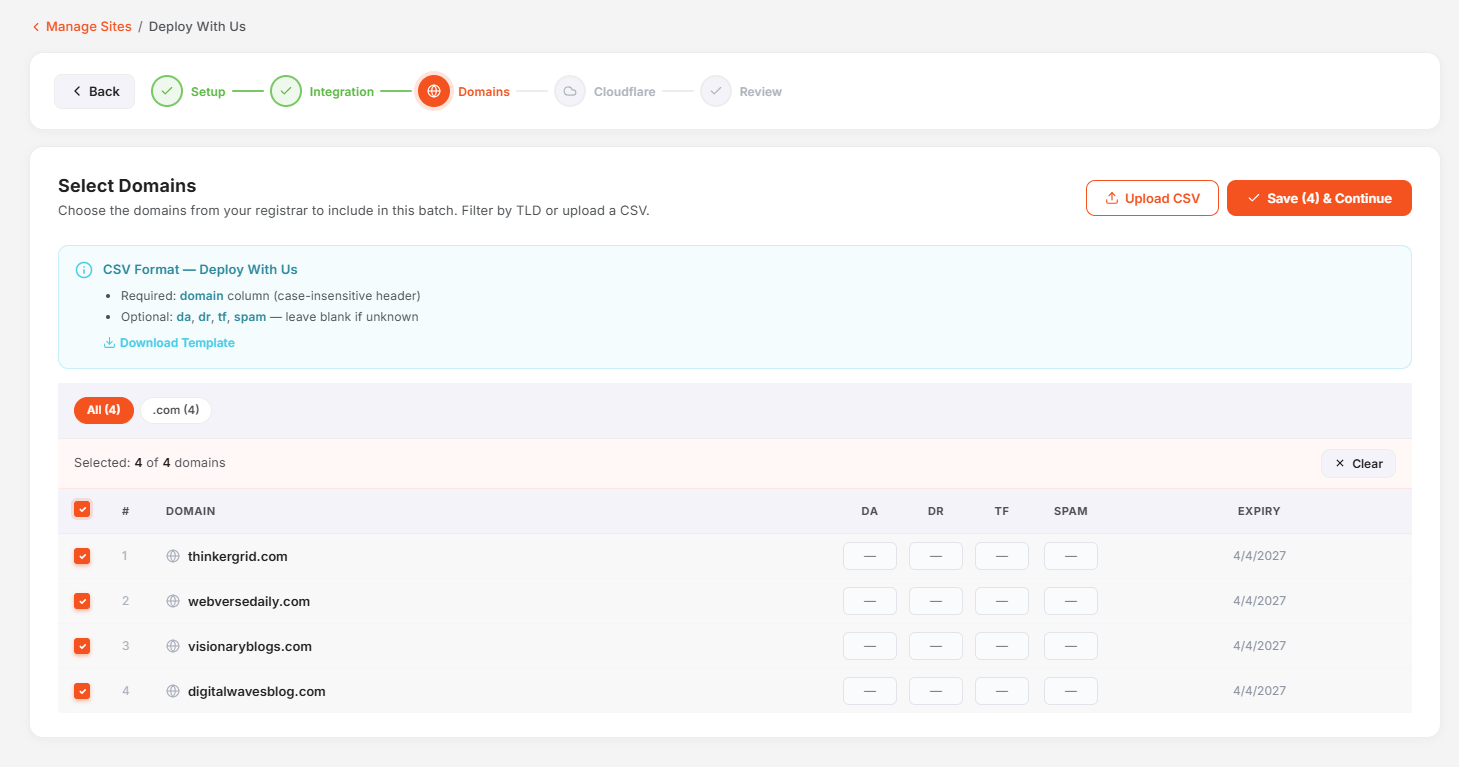
After clicking Save & Continue, NextBacklinks pulls all domains registered in your registrar account and displays them here. Review the list to confirm everything looks correct before moving to the next step.
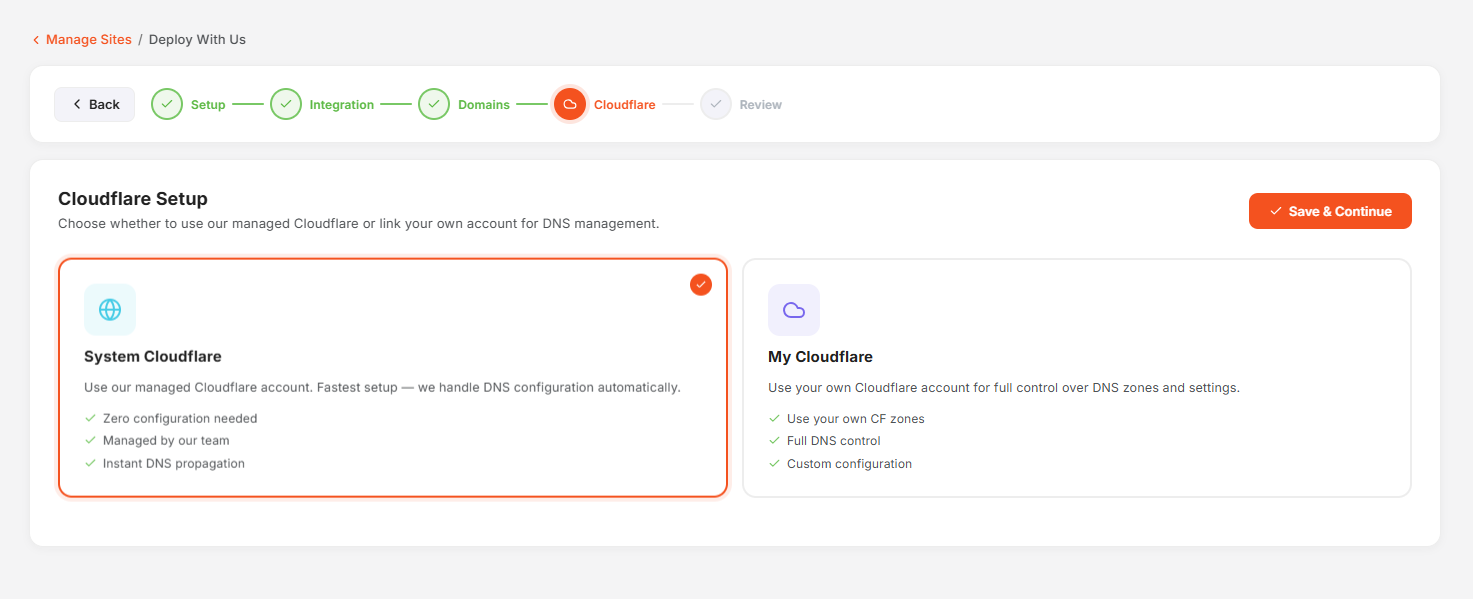
Select whether to use the NextBacklinks system Cloudflare or connect your own Cloudflare account. If you choose your own, enter your Cloudflare API key here or add it first via the Integrations tab.
Connect With Us - Step-by-Step Flow
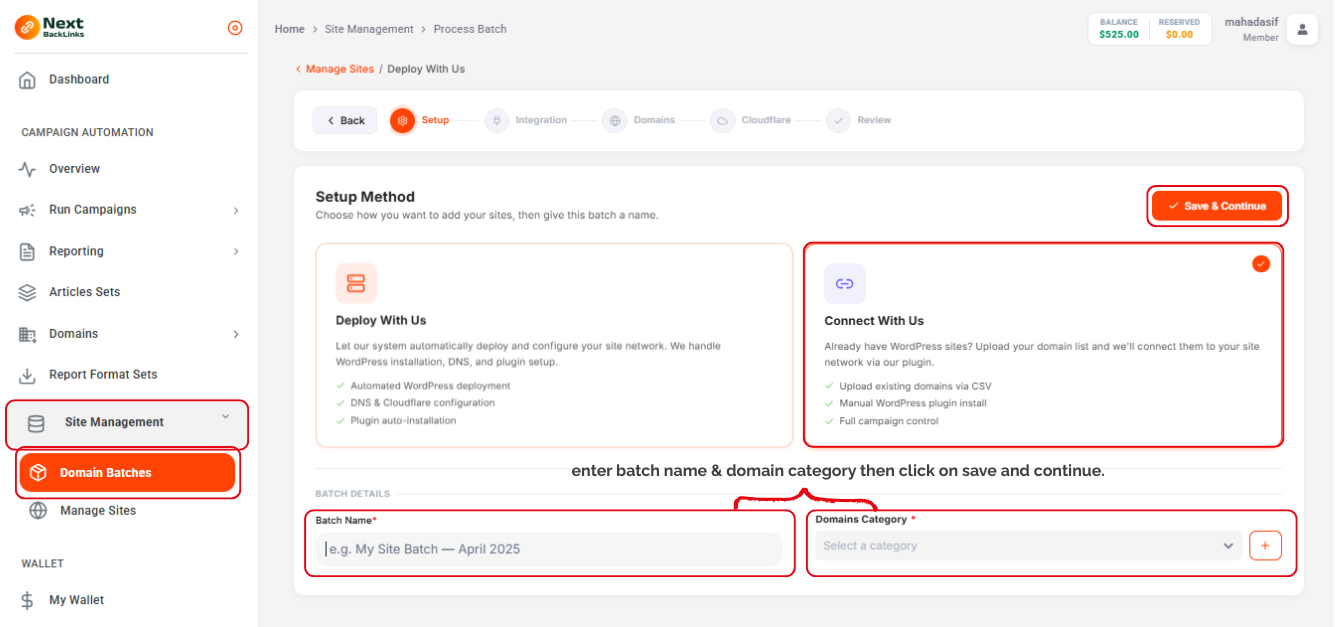
Fill in the batch name and domain category, select Connect With Us, then click Save & Continue to proceed.
.csv file containing your domains. The file must include these columns: domain, da, dr, tf, spam.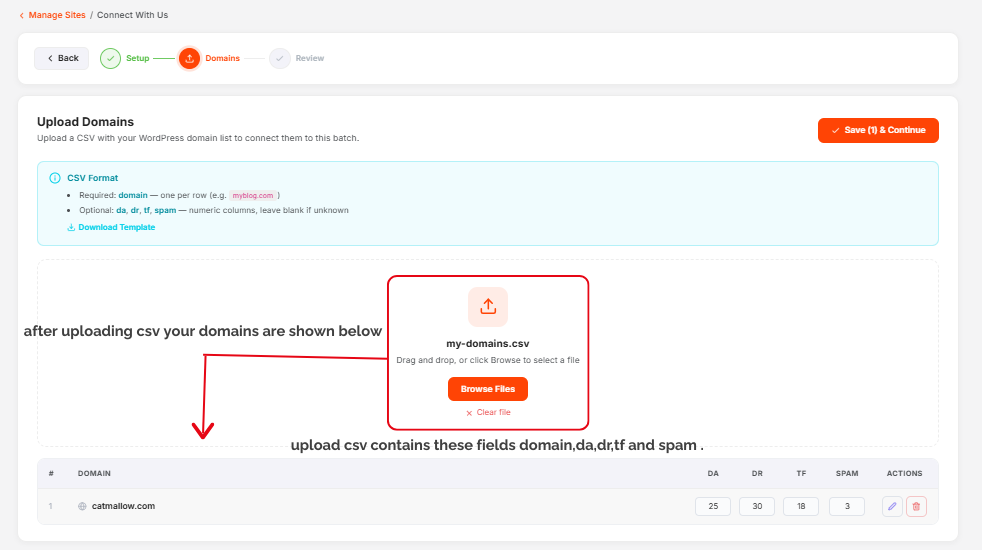
Upload your .csv file with the required columns: domain, da, dr, tf, spam. Once uploaded, click Save & Continue to proceed.
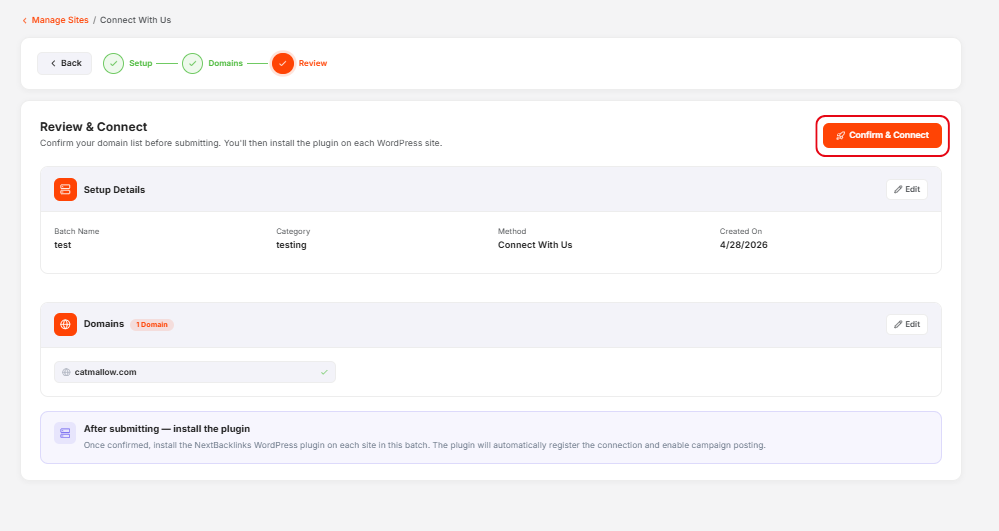
This screen confirms your batch details and provides the downloadable NextBacklinks WordPress plugin link. Download the plugin file from here before moving to the next step.
Domain List
The Domain List is your complete directory of every domain in your account. All domains added across all your batches - whether imported via CSV (Connect With Us) or fetched from a registrar (Deploy With Us) - appear here in one consolidated view.
Domain Metrics Columns
Each domain in the list displays the following SEO metrics at a glance:
Domain Sets
The Domain Sets sub-tab lets you group any selection of your domains into a named collection. Instead of picking domains one by one every time you create a campaign, you build a set once and reuse it across multiple campaigns.
When you first visit this tab, the list will be empty - no sets exist yet. A Create New Domain Set button sits in the top-right corner.
Creating a Domain Set
Click Create New Domain Set to open the set builder modal. Follow these steps:
How Domain Sets Are Used in Campaigns
When you create a blog post or sidebar link campaign under Run Campaigns, one of the required fields is your target domain group. Instead of selecting individual domains, you simply pick a pre-built Domain Set. NextBacklinks then distributes the campaign across every domain in that set automatically.
What Are Article Sets?
Article Sets are your content library inside NextBacklinks. When you run a Blog Post Links campaign, the platform pulls articles from whichever article set you select and uses them as the post content published on your PBN domains. You can have multiple article sets - one per niche, language, or campaign type.
Creating an Article Set
Clicking Create New Article Set opens a modal with two fields to fill:
After submitting, the new article set appears as a row in the list. Each row shows the set name you entered along with three action icons:
The Article Workspace
Clicking the Add New Article icon takes you to a dedicated page for that article set. The page is split into two halves:
Method 1: Harvest AI Articles
Generates articles automatically using an AI integration. Click Select on the Harvest AI option to open the generation modal, which has the following fields:
Method 2: Add Simple Article
Manually write and add a single article. Click Select to open a modal with the following fields:
Method 3: Add Spintax
Add an article using spintax syntax, which lets a single template generate many unique content variations. Click Select to open a modal with:
{Best|Top|Greatest} SEO Tips produces three title variations.Method 4: Bulk DOCX Upload
Import multiple articles at once from a .docx file. Click Select to open a modal where you can upload your Word document. The platform parses the file and adds each article it finds into the set.
Method 5: Bulk TXT & HTML Upload
Import articles from plain text or HTML files. Click Select to open a modal where you can upload a .txt or .html file. Useful for importing content from any source that can export to these formats.
Blog Post Links
Blog Post Links publishes full blog posts with embedded backlinks across your PBN domains. When you click this option, the campaign creation screen appears with three modes you can switch between: Automatic, Manual, and Auto Google Doc.
Blog Post Links - Automatic

Select Blog Post Links from the Run Campaigns screen, then choose Automatic mode to let NextBacklinks handle content generation and scheduling automatically.
Section 1: Campaign Info All mandatory

Section 2: Content Setup All mandatory

Section 3: Target & SEO

Anchor Rel (optional)
Set the rel attribute on the backlinks in this campaign. Common values are sponsored and nofollow. Leave blank to publish links without a rel attribute.

Campaign Toggles

Blog Post Links - Manual
Manual Mode Overview
Manual mode gives you full control via a CSV upload. Instead of the system selecting domains automatically, you specify exactly which domain posts which keyword to which URL in a spreadsheet.
sponsored or nofollow.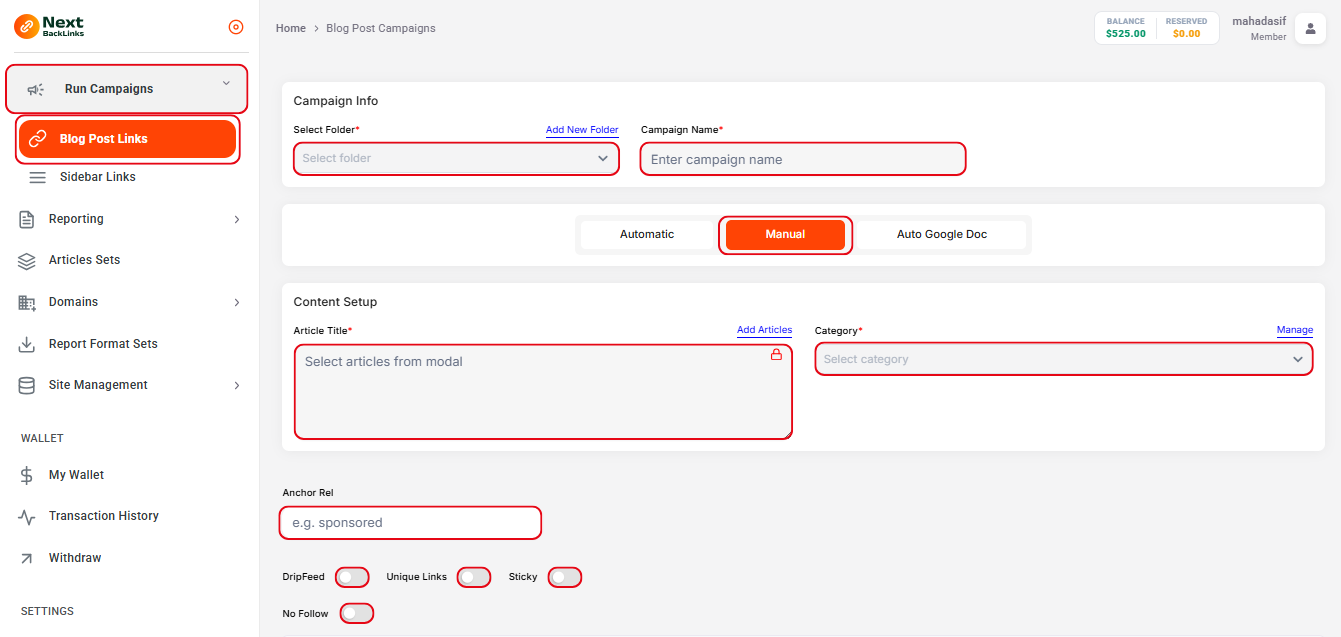
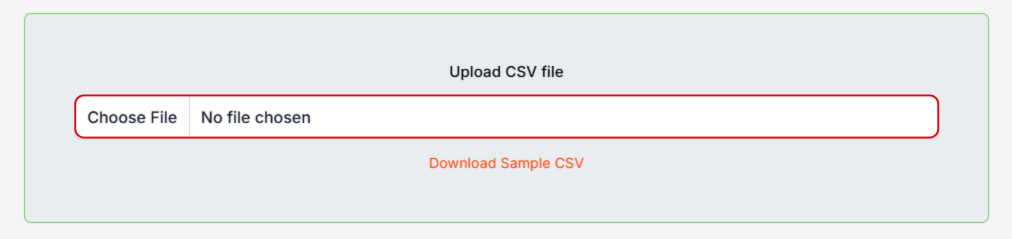
Manual Mode - CSV Upload Mandatory
Upload a .csv file that defines the exact posting instructions. The file must contain the following columns:
Blog Post Links - Auto Google Doc
Auto Google Doc Mode Overview
Auto Google Doc mode lets you supply your own article content via a CSV rather than using Article Sets. The CSV contains the article text alongside each domain and an optional media URL. Useful when you have pre-written content in Google Docs or any external source.
sponsored or nofollow.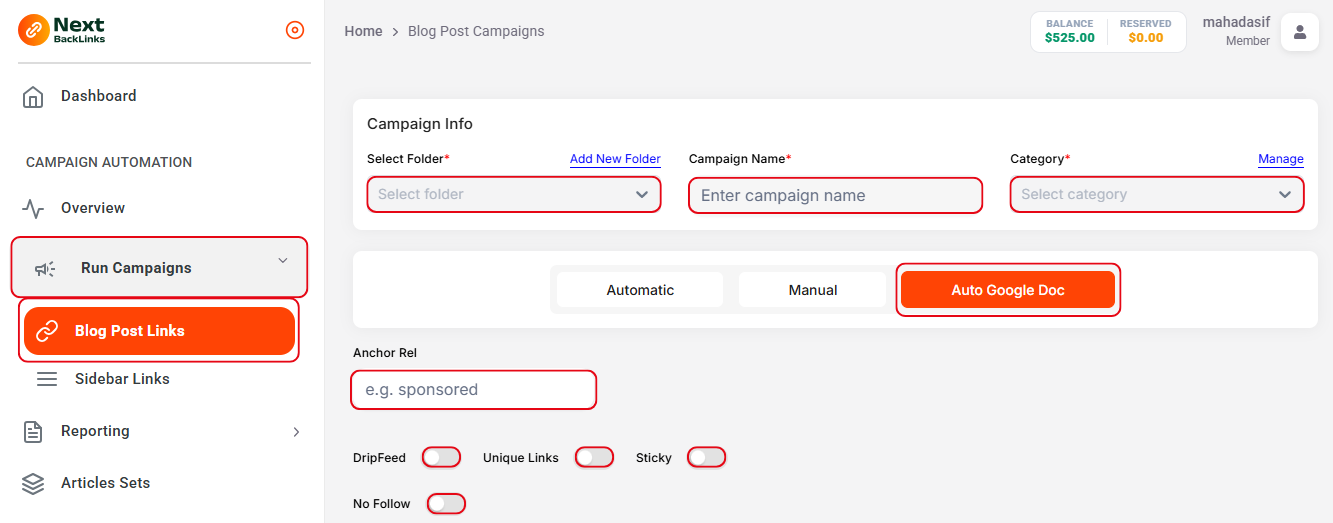
Auto Google Doc - CSV Upload Mandatory
Upload a .csv file containing your article content alongside each domain. Required columns:
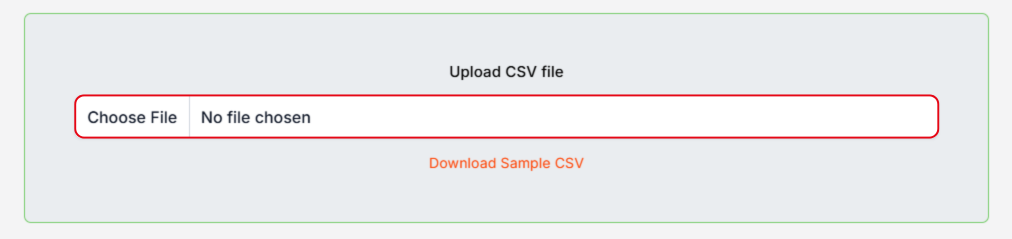
Sidebar Links
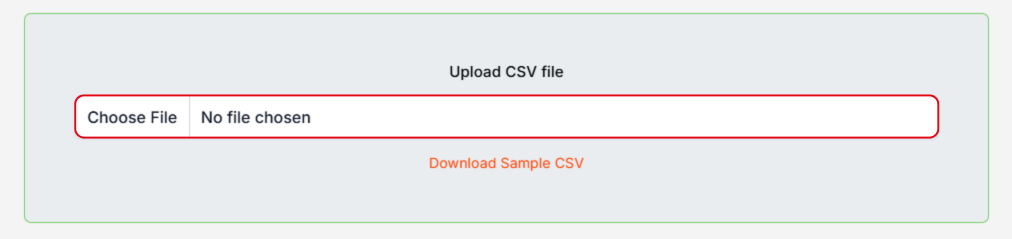
Sidebar Links pushes widget-style backlinks into the sidebar of your PBN sites. These are lightweight, fast-deploying links ideal for building wide topical authority across many domains at once. The campaign screen has two modes: Automatic and Manual.
Sidebar Links - Automatic

Section 1: Campaign Info All mandatory

Section 2: Target & SEO All mandatory
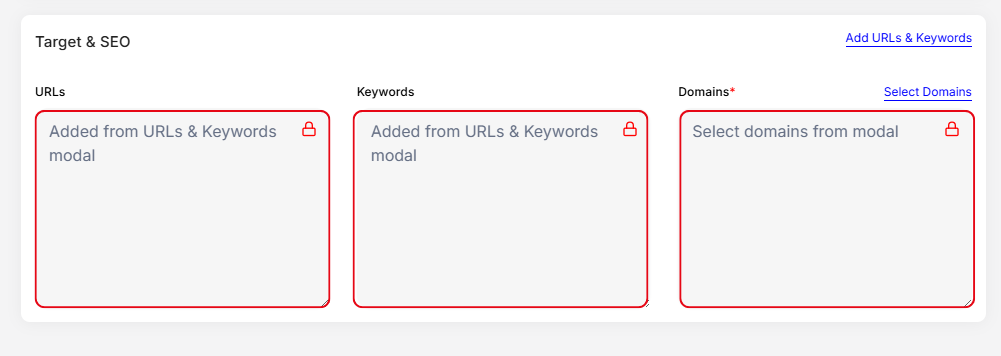
Campaign Toggles

Sidebar Links - Manual
Manual Mode Overview
Manual mode for sidebar links uses a CSV to define exactly which domain places which keyword linking to which URL - giving you precise control over every sidebar placement.
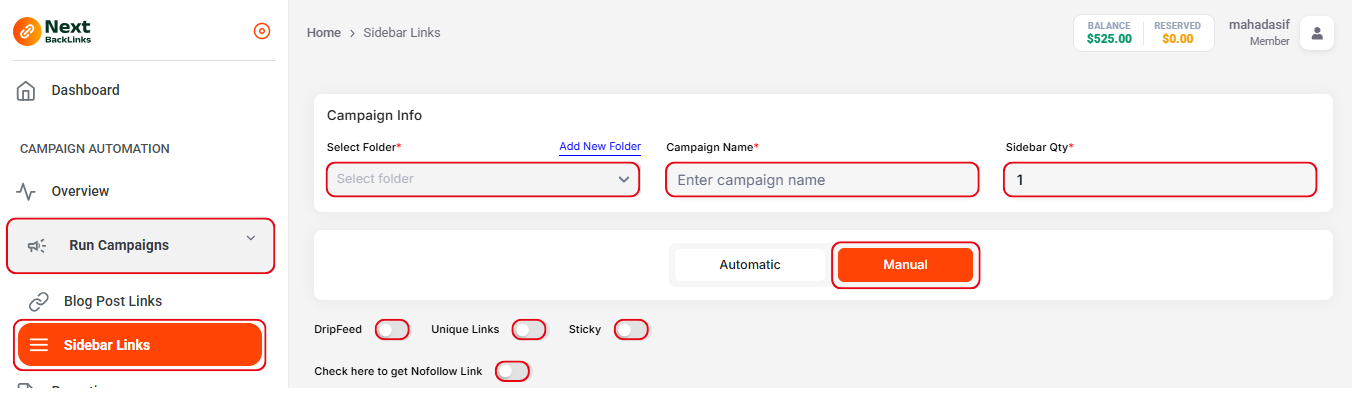
Sidebar Manual - CSV Upload Mandatory
Upload a .csv file specifying each sidebar placement. Required columns:
Reporting Overview
The Reporting tab is where you monitor everything that happens after you launch a campaign. It gives you live visibility into how many links are posted, which campaigns are active, and the status of every domain placement. There are three sub-sections: PBN Post Report, Sidebar Post Report, and Folders.
PBN Post Report
This sub-tab shows all campaigns you have created using Blog Post Links under Run Campaigns. Every campaign you have ever launched appears here as a row in the list.
• Download - exports the campaign result as a CSV file containing all posting details (domains, URLs, live dates, metrics).
• View Detail - opens an inline detail view showing a breakdown of every post in the campaign.
• Delete - permanently removes the campaign record from your account.
Sidebar Post Report
This sub-tab works exactly like PBN Post Report but is dedicated to campaigns created using Sidebar Links under Run Campaigns. Every sidebar campaign you have launched appears here.
• Download - exports the sidebar campaign results as a CSV file.
• View Detail - opens a detailed breakdown of every placement in the campaign.
• Delete - permanently removes the campaign record.
Folders
Folders are used to organise your campaigns into groups. When creating any campaign - whether a Blog Post Links or Sidebar Links campaign - selecting a folder is mandatory. You cannot launch a campaign without assigning it to a folder.
What Are Report Format Sets?
Report Format Sets let you customise how your exported campaign reports look - specifically the columns that appear and the header styling. Instead of plain default exports, you can create a branded format with your chosen colors and save it as a reusable template. This is especially useful when sharing reports with clients.
Creating a Report Format
The format builder presents four options to configure:
Once all options are configured, click Save to store the format. It will appear in your format set list and become available to select whenever you export a campaign report.
Team Members Overview
The Team Members tab lets you invite people to your NextBacklinks account and control exactly what they can see and do. You can grant access per project and per module - so a team member only sees the parts of the platform you explicitly give them access to.
When you open this tab you will see three buttons at the top: Manage Team, Team Activity, and New Member.
Manage Team
Clicking Manage Team shows the list of all team members currently added to your account - their name, email, and the access level assigned to them. If you are a new user and have not added anyone yet, the list will be empty.
Team Activity
Clicking Team Activity shows a log of actions performed by your team members inside the platform. Use this to monitor what each member has been doing - campaigns launched, settings changed, reports downloaded, and similar events.
Adding a New Team Member
Click New Member to open a pop-up with the following fields:
Once all fields are filled, click Create Member to add them to your team. They can immediately log in with the email and password you set.
Integrations Overview
The Integrations tab is where you connect NextBacklinks to the external services it needs to automate your workflow. There are currently 8 integrations available, organised into four categories: Domain, DNS, Media, and AI. Each integration unlocks a specific part of the platform - without the relevant integration connected, certain features will not be available.
Domain - Registrar Integrations
Domain integrations connect NextBacklinks to your domain registrar accounts. Once connected, the platform can automatically fetch all the domains registered under your account and make them available for use when creating a PBN Management batch using the Deploy With Us option. There are four supported registrars:
DNS - Cloudflare
The DNS category contains one integration: Cloudflare. Connecting your Cloudflare account allows NextBacklinks to automate DNS configuration for your PBN domains during the Deploy With Us setup process. Instead of manually updating nameservers and DNS records for every domain, the platform handles it automatically using your Cloudflare account. You add your Cloudflare API key here - or you can choose to use the NextBacklinks system Cloudflare if you prefer not to connect your own.
Media - GetImage
The Media category contains one integration: GetImage. Connecting GetImage allows NextBacklinks to automatically generate and attach images to blog posts published during your campaigns. This means your PBN posts can include relevant images without you needing to source or upload them manually - the platform generates them on the fly using the GetImage API.
AI - Article Generation
The AI category contains two integrations used to automatically write article content for your campaigns. Once an AI integration is connected, you can use the Harvest AI option inside Article Sets to generate articles at scale without writing them manually.
All Available Integrations
AI Content Overview
NextBacklinks integrates with leading AI providers to automatically generate SEO-optimized articles for your backlink campaigns. Choose between OpenAI's ChatGPT or DeepSeek AI based on your needs and budget.
AI Content Prompt Library
Get started faster with our comprehensive collection of proven AI content generation prompts and templates. This PDF includes ready-to-use prompts for articles, blog posts, landing pages, and more.
Pro tip: Save this PDF locally for offline reference during your content creation workflow.
OpenAI / ChatGPT Setup
Step 1: Create OpenAI Account
Navigate to https://platform.openai.com/signup and create a new account or sign in to your existing one.
Pro tip: Use a professional email address as this will be linked to your API usage and billing.
Step 2: Access API Keys
Once logged in, you will be redirected to this url https://platform.openai.com/home click on → "API Keys" from the sidebar menu, or navigate directly to https://platform.openai.com/api-keys.
Step 3: Generate New API Key
Click the "Create new secret key" button. Use a clear name that shows this key is for NextBacklinks article generation.
Recommended names: nextbacklinks-prod-article-gen or nextbacklinks-production.
Best practice: use lowercase letters and hyphens only, and keep the name descriptive so you know what app and purpose it serves.
Important: This key will only be shown once. Store it securely and never share it publicly.
Step 4: Set Up Billing & Spending Controls
Go to Billing Overview and add only the amount you want to spend (e.g., $10). Turn OFF Auto Recharge to prevent automatic billing.
Set up email alerts: Go to Limits, set monthly budget to $8 and notification threshold to 80%.
Cost estimate: ~$0.002 per 1K tokens. A 2,000-word article costs ~$0.15-0.30.
With auto-recharge OFF, API stops when credits run out. Monitor usage at platform.openai.com/usage.
Step 5: Connect to NextBacklinks
In your NextBacklinks dashboard, go to Settings → Integrations → OpenAI and paste your API key.
Best practices: Set usage limits in OpenAI dashboard and monitor your token consumption regularly.
DeepSeek AI Setup
Step 1: Create DeepSeek Account
Visit https://platform.deepseek.com/sign_up to create your account. DeepSeek offers competitive pricing for AI content generation.
Step 2: Access API Keys
After registration, navigate to the API Keys section at https://platform.deepseek.com/api_keys.
Step 3: Generate API Key
Click "Create API Key" and use a clear name that shows this key is for NextBacklinks article generation.
Recommended name: nextbacklinks-prod-article-gen.
Best practice: use lowercase letters and hyphens only, and keep the name descriptive.
Copy the key immediately - it is shown only once. Store it securely.
Step 4: Set Up Billing & Spending Controls
In the left sidebar, click "Top Up" and add only the amount you want to spend (e.g., $10). DeepSeek uses prepaid credits - you can only be charged up to what you've topped up.
Do NOT enable Auto Recharge unless you want the API to continue after your balance runs out. When credits reach $0, all API calls stop automatically.
New accounts get 5 million free trial tokens (~$8.40 value) for 30 days. Monitor usage at platform.deepseek.com/usage.
Cost advantage: DeepSeek often provides 50-70% savings compared to OpenAI. Refunds available for unspent balance at platform.deepseek.com/transactions.
Step 5: Connect to NextBacklinks
In NextBacklinks, go to Settings → Integrations → DeepSeek and enter your API key.
Performance tip: DeepSeek's API often has faster response times, making it ideal for bulk article generation.
Token Management & Best Practices
Monitor Usage
Set up billing alerts in both OpenAI/DeepSeek dashboards and NextBacklinks. Track token consumption per campaign.
Optimize Prompts
Use clear, specific prompts in your Article Sets. Include target keywords, tone, and length requirements for better results.
Rate Limiting
Respect API rate limits. NextBacklinks automatically handles queuing, but avoid rapid successive API calls.
Security First
Rotate API keys regularly. Use environment variables in production. Never expose keys in client-side code.
Cloudflare & Domain API Overview
Connect your domain registrars and DNS provider to automate the entire deployment process. NextBacklinks supports major registrars and provides seamless Cloudflare integration for DNS management.
Cloudflare DNS Setup
Step 1: Create Cloudflare Account
Sign up at https://dash.cloudflare.com/sign-up. Choose the free plan for basic DNS management or paid plans for advanced features.
Step 2: Generate API Token
Go to https://dash.cloudflare.com/profile/api-tokens and click "Create Token". Select the "Edit zone DNS" template.
Step 3: Configure Token Permissions
Set permissions to include "Zone - DNS - Edit" and "Zone - Zone - Read". Specify the domains you want to manage or use "All zones" for full access.
Step 4: Get Zone IDs
For each domain, visit the domain's overview page to find the Zone ID. You can also use the API to list zones: curl -X GET "https://api.cloudflare.com/client/v4/zones" -H "Authorization: Bearer YOUR_TOKEN"
Step 5: Connect to NextBacklinks
In NextBacklinks Settings → Integrations → Cloudflare, enter the following details:
• Connection Name: A descriptive label (e.g., "Main PBN Cloudflare")
• API Token: The token you generated in Step 2
• Cloudflare Account Email: The email associated with your Cloudflare account
Pro tip: Test the connection with a single domain first before adding multiple zones.
Domain Registrar APIs
Purpose: Connect your domain registrar accounts to import and fetch your existing domains into NextBacklinks. Once imported, you can use these domains in your link-building campaigns, PBN deployments, and other SEO workflows.
Namecheap
How it works: Namecheap provides API access to import and manage your domain portfolio. NextBacklinks uses their API to fetch your domains and sync them for use in campaigns.
Setup in NextBacklinks: Go to Settings → Integrations → Namecheap and enter:
• Name: A descriptive label (e.g., "Namecheap Main")
• API Key: Generated from your Namecheap account API settings
• Username: Your Namecheap account username
• Whitelisted Client IP: The IP address of your server (if required by your account security settings)
Pro tip: Enable API access and generate your key at ap.www.namecheap.com/settings/tools/apiaccess. You must whitelist your IP on the same page before the API will work.
DynaDot
How it works: DynaDot offers RESTful API access for domain portfolio management. NextBacklinks syncs your DynaDot domains for campaign deployment and management.
Setup in NextBacklinks: Go to Settings → Integrations → DynaDot and enter:
• Name: A descriptive label (e.g., "DynaDot Portfolio")
• API Key: Generated from your DynaDot account
• Secret Key: Your DynaDot secret key for secure API access
• Server IP Whitelisting: Add your server IP to DynaDot's whitelist if required
Generate your API Key and Secret Key at dynadot.com/account/setting/api.html. Keep your secret key secure and never share it.
Regery
How it works: Regery specializes in bulk domain operations and provides fast, reliable API access for domain import and management. NextBacklinks uses Regery to fetch and manage your domain portfolio for campaigns.
Setup in NextBacklinks: Go to Settings → Integrations → Regery and enter:
• Name: A descriptive label (e.g., "Regery Bulk Domains")
• API Key: Your Regery API key
• Secret Key: Your Regery secret key for API authentication
Generate your API Key and Secret Key from your Regery account at regery.com/en/account/api.
Spaceship
How it works: Spaceship provides modern GraphQL API for efficient domain portfolio access. NextBacklinks integrates with Spaceship to import your domains and enable real-time updates for your campaigns.
Setup in NextBacklinks: Go to Settings → Integrations → Spaceship and enter:
• Name: A descriptive label (e.g., "Spaceship Domains")
• API Key: Your Spaceship API token
• Secret Key: Your Spaceship secret key for secure authentication
Generate your API Key and Secret Key from your Spaceship account at spaceship.com/application/api-key.
DNS Automation & Best Practices
DNS Propagation
Allow 24-48 hours for DNS changes to propagate globally. Test with multiple DNS checkers before deploying sites.
SSL Certificates
Cloudflare automatically provisions SSL certificates. Ensure "Always Use HTTPS" is enabled for security.
Backup Records
Export current DNS records before making changes. Keep backups of all zone configurations.
Rate Limits
Respect registrar API limits. NextBacklinks queues requests automatically, but avoid bulk operations during peak hours.
Get Image Overview
Get Image is a media generation service that automatically creates or sources relevant, high-quality images for your articles. NextBacklinks integrates with Get Image to automatically populate your blog posts with visuals, improving article quality, user engagement, and SEO performance.
Get Image Setup
Step 1: Create Get Image Account
Sign up at getimg.ai/join. Get Image offers free trials with limited credits, as well as paid plans for higher volume image generation.
Pro tip: Start with a free trial to test the image quality and style before committing to a paid plan.
Step 2: Generate API Key
Log in and go directly to your API keys page at getimg.ai/account/api-keys. Click Create API Key to generate your credentials.
Use a descriptive name for your API key, such as nextbacklinks-media or pbn-article-images.
Security: Copy your API key immediately after generation. It will only be shown once. Store it securely.
Step 3: Review Your Plan & Credits
Check available plans and credit limits at getimg.ai/pricing. Monitor current credit usage from your account dashboard at getimg.ai/account. Configure your preferences:
• Image Style: Choose between realistic, illustration, stock photos, or AI-generated styles
• Image Size: Set default dimensions (recommended: 1200x600px for blog headers)
• Image Quality: Select resolution (high quality recommended for PBN blogs)
Step 4: Connect to NextBacklinks
In NextBacklinks Settings → Integrations → Get Image, enter the following details:
• Name: A descriptive label (e.g., "Get Image Media")
• API Key: The API key you generated in Step 2
Pro tip: Once connected, images will automatically be added to your Article Sets when you enable image generation in campaign settings.
How to Use Get Image with Article Sets
Enable Image Generation in Articles
When creating or editing an Article Set, check the "Include Images" option. NextBacklinks will automatically generate relevant images based on your article topics and keywords.
Customize Image Prompts
Provide custom prompts or keywords for Get Image to use when generating visuals. For example: "landscape photography of mountains at sunset" or "infographic about digital marketing trends".
Image Placement
Images are automatically placed at the top of your blog posts (featured image) and inline throughout the content for visual variety and improved readability.
Monitor Image Credits
Each image generated consumes credits from your Get Image account. Monitor your usage at getimg.ai/account and top up credits at getimg.ai/pricing to avoid running out mid-campaign.
Cost estimate: Image generation costs vary based on quality and style. Budget approximately $0.10-$0.50 per image depending on your plan.
Benefits of Image-Enhanced Content
Improved Engagement
Articles with relevant images receive 94% more views and engagement compared to text-only content.
SEO Benefits
Optimized images with alt text improve page SEO, increase time-on-page, and enhance content freshness scores.
Faster Content Production
Automated image generation eliminates the need to manually source or purchase stock photos, saving time and money.
Professional Brand Image
High-quality, relevant images enhance your PBN sites' credibility and make content appear more professional and trustworthy.
What is NextBacklinks?
NextBacklinks is an off-page SEO automation portal designed for professional search engine optimizers. It centralizes PBN management, backlink campaign automation, domain batch deployment, AI article generation, and campaign reporting in one platform.
What is the difference between Deploy With Us and Connect With Us?
Deploy With Us is a fully managed option - NextBacklinks handles domain setup, WordPress installation, hosting, and DNS. Connect With Us is for users with existing WordPress sites who download the NextBacklinks plugin and connect their sites to the platform.
Which domain registrars are supported?
NextBacklinks currently integrates with DynaDot, Regery, Spaceship, and Namecheap via their API keys. More registrars may be added in future updates.
Can I use AI to generate articles?
Yes. NextBacklinks integrates with both OpenAI (ChatGPT) and DeepSeek AI. Add your API key in the Integrations tab, then use the Harvest AI Articles option inside any Article Set to generate SEO-optimized content automatically.
What does the DripFeed toggle do?
DripFeed spreads your backlink posts over a period of time rather than publishing them all at once. This mimics natural link acquisition velocity, reducing footprint risk and making your link-building patterns appear more organic to search engines.
Is the WordPress plugin available on the WP Plugin Directory?
Currently, the NextBacklinks Connector plugin is only available for download directly from the platform. It will be submitted to the official WordPress Plugin Directory in the near future, allowing direct installation from the WP plugin marketplace.